
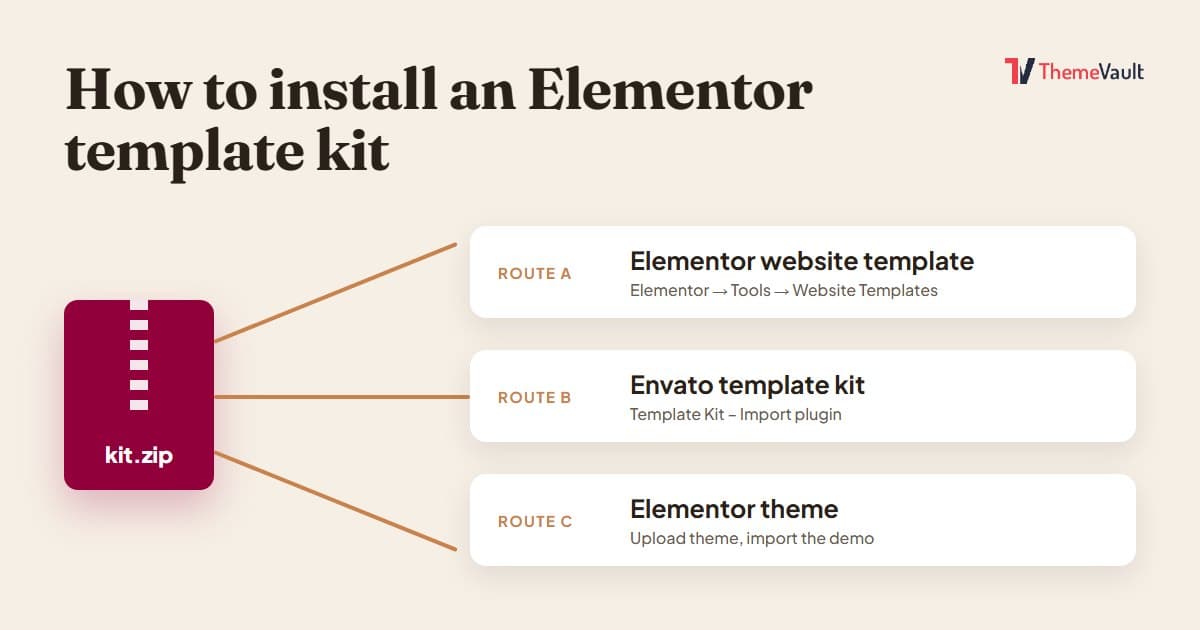
You bought or downloaded an Elementor template kit, you have a zip file on your desktop, and now you’re staring at the WordPress dashboard wondering where it goes. That’s a very normal place to be. The confusing part isn’t that installing a kit is hard. It’s that “Elementor template kit” means two different things, they install in two different places, and most guides only describe one of them.
To write this properly we didn’t work from memory. On 2 November 2026 we set up clean WordPress sites (WordPress 7.1, the free Hello Elementor theme, free Elementor 4.2.4), built a small three-page café kit called Corner Crumb, exported it in both formats, and installed it again on empty sites the way a buyer would. Every menu name, button and message below is copied from those screens. Elementor renames things often, so if your screen looks slightly different, the steps will still be in the same order.
First, work out which kind of kit you have
Envato’s own export plugin explains the difference better than most articles do, so here it is in their words. An Envato Template Kit is the format sold on ThemeForest and Envato Elements: “Customers can pick and choose individual templates to import. Supports 3rd party plugins.” An Elementor Kit (Elementor now calls these “Website Templates”) is a full-site package: “Customers cannot choose individual templates, only a ‘Full Site’ import overwriting their current site.”
You can usually tell which one you have in ten seconds. Open the zip (don’t install it yet, just look inside):
- If you see a templates folder full of .json files, a screenshots folder and a manifest.json, it’s an Envato-style kit. Use the Template Kit Import plugin (Route B below).
- If you see site-settings.json, a content folder and a wp-content folder, it’s an Elementor website template. Use Elementor’s own importer (Route A).
- If the zip has a style.css and functions.php inside a folder, it isn’t a kit at all. It’s a WordPress theme, and it installs under Appearance → Themes (Route C).
Many marketplace downloads are a zip inside a zip, with the licence and help files next to the real kit. If the folders above aren’t there, look for a second zip and use that one.
Before you start: three checks
Use a fresh or test site if you can. A full-site kit import replaces your front page, adds pages and menus, and changes your global colours and fonts. Elementor doesn’t delete your existing pages, but it does change how the whole site looks. If you’re importing into a site that already has content, take a backup first.
Install the theme the kit was made for. Almost every kit is built and tested with Hello Elementor, the free, almost-empty theme from the Elementor team. Envato’s importer says so outright: “This Template Kit has only been tested with the ‘Hello Elementor’ WordPress theme.” Install it under Appearance → Themes → Add New Theme before you import anything. Other themes often add their own title bars, sidebars and fonts on top of the kit.
Check whether the kit needs Elementor Pro. This is the one that catches people out. Headers, footers, popups and blog archive templates are Pro features, so a kit that includes them only works fully with Pro. Good kit pages say “Elementor Pro required” or “works with free Elementor” clearly. If it doesn’t say, assume the header and footer won’t import on the free version (we explain what you see when that happens below).
Route A: install an Elementor website template (.zip)
This is Elementor’s built-in importer. It needs only the free Elementor plugin.
1. Open the importer
In wp-admin go to Elementor → Tools and click the Website Templates tab. You’ll see two boxes: “Export this website” and “Apply a Website Template”. Under Apply a Website Template click Import.
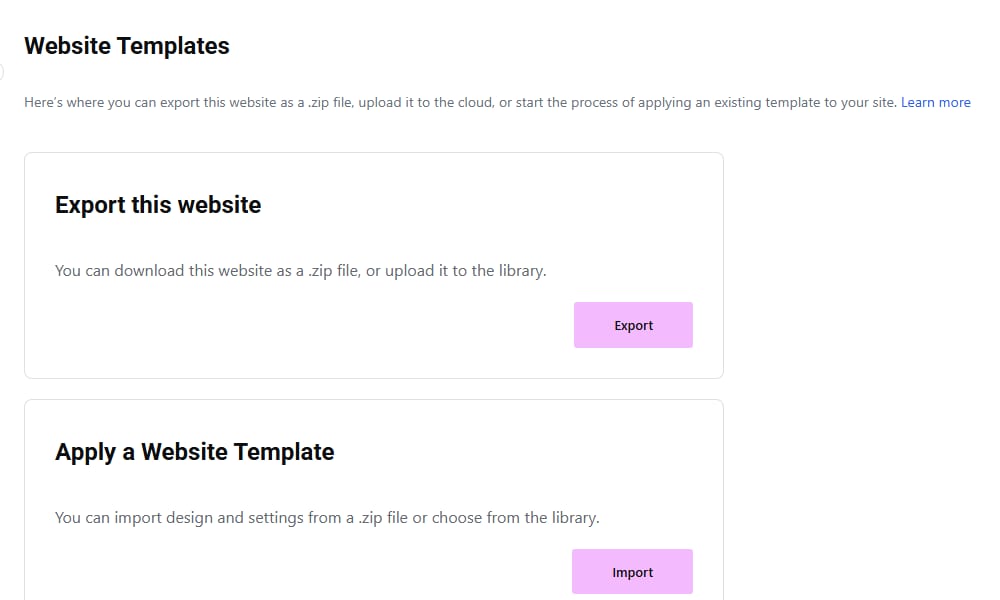
Don’t confuse this with Templates → Import Templates in the same menu. That button takes a single template file (one .json), not a whole kit, and a full kit zip uploaded there won’t give you the pages and settings.
2. Upload the zip
The next screen says “Import a website template” with a box to click or drag a file into. Drop your kit’s .zip on it. Ours was 8.5 KB because it had no photos; a real kit with images is usually several megabytes, so give it a moment.
3. Choose what to apply
After the upload Elementor shows “Select which parts you want to apply”, with everything ticked:
- Content: the kit’s pages, posts and menus.
- Templates: saved templates, headers, footers, archives, popups. On free Elementor this row is greyed out with an Upgrade button, because those are Pro features.
- Settings & configurations: global colours, global fonts, theme style, layout settings.
- Plugins: “All plugins are required for this website templates to work.”
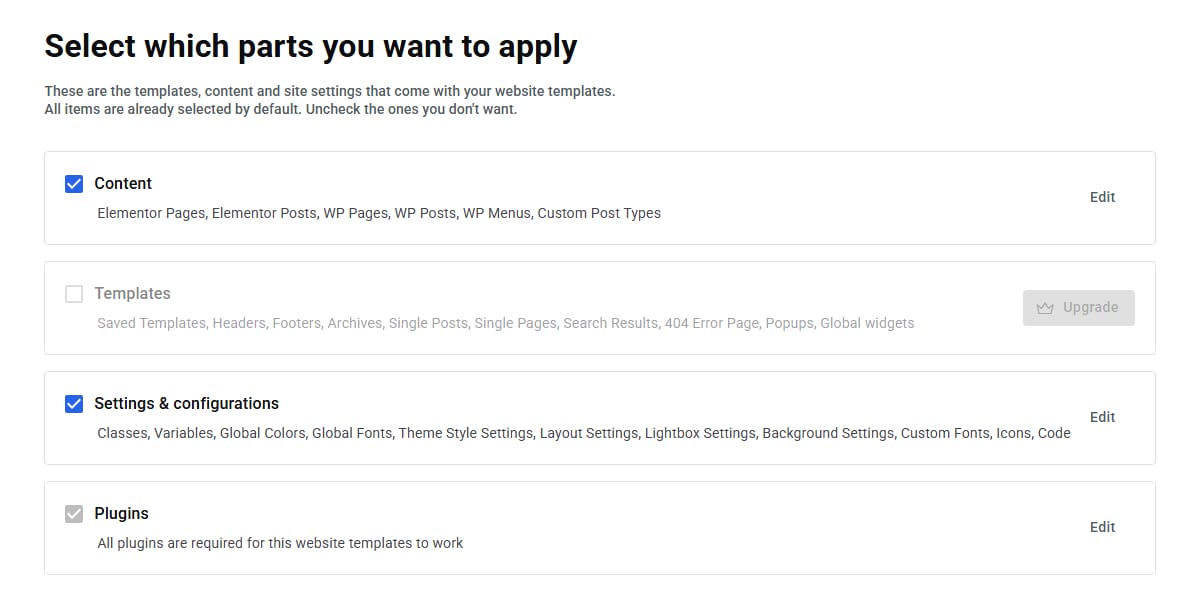
Click Edit on the Plugins row before you go on. A kit records every plugin that was active on the site it was exported from, and the importer will activate them all. Our first test kit listed three plugins, and all three were switched on during the import, including one the kit didn’t actually need. If you see something you don’t want, untick it here.
4. Import and apply
Click Import and apply. You’ll see “Setting up your website template… Don’t close this window until the process is finished” while it activates plugins and creates pages. Leave the tab alone until it finishes. When it’s done you get “Your website template is now live on your site!” and a list of what was imported.
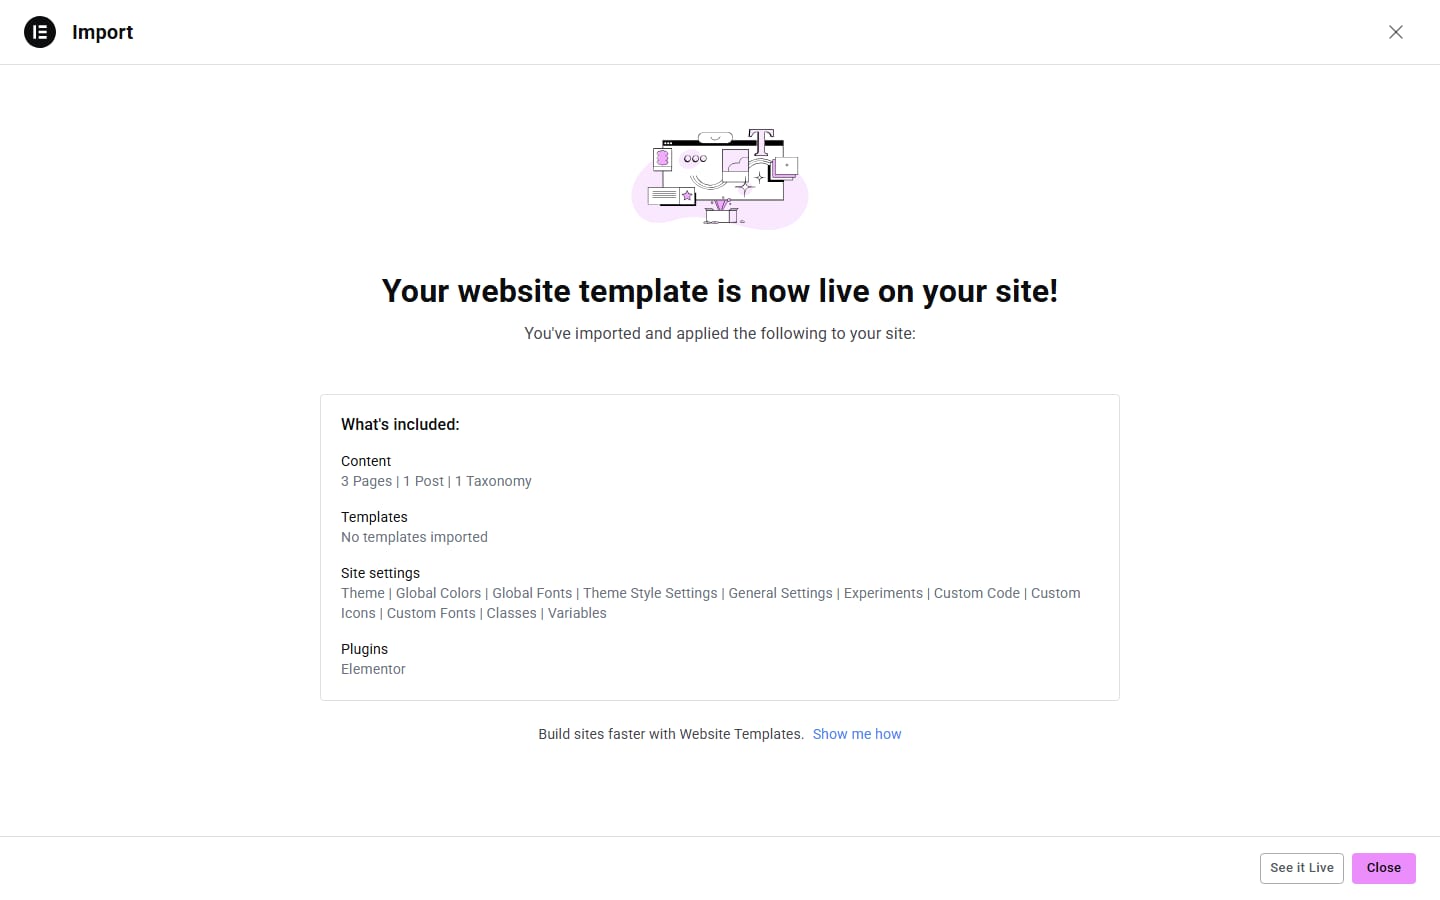
5. Tidy up
Visit the site. On ours, the kit’s Home page had become the front page and the brand colours were applied everywhere. One thing didn’t change: the site title still said “Fresh site”, because the kit doesn’t touch it. Set yours under Settings → General, then work through the kit’s pages replacing its text and photos with your own.
A note on Elementor’s own library: clicking the Website Templates tab heading opens a gallery of ready-made kits you can apply directly. When we counted on 2 November it listed 58, and only 6 were marked Free. The other 52 showed an Upgrade button (9 on the Essential plan, 43 on Advanced and higher). So if you’re browsing there on the free plugin, use the Plan → Free filter first to save yourself some disappointment.
Route B: install an Envato kit with Template Kit Import
Kits from ThemeForest and Envato Elements work differently. Instead of rebuilding your whole site, they import each page design as a template, and you place those templates onto pages yourself. It takes a few more clicks, but you choose exactly what goes where.
1. Install the right plugin
Go to Plugins → Add Plugin and search for Template Kit Import. Be careful here: in our search the first result was a different plugin (an add-ons pack). The one you want is “Template Kit – Import” by Envato, which had 400,000+ active installations. Install it and click Activate.
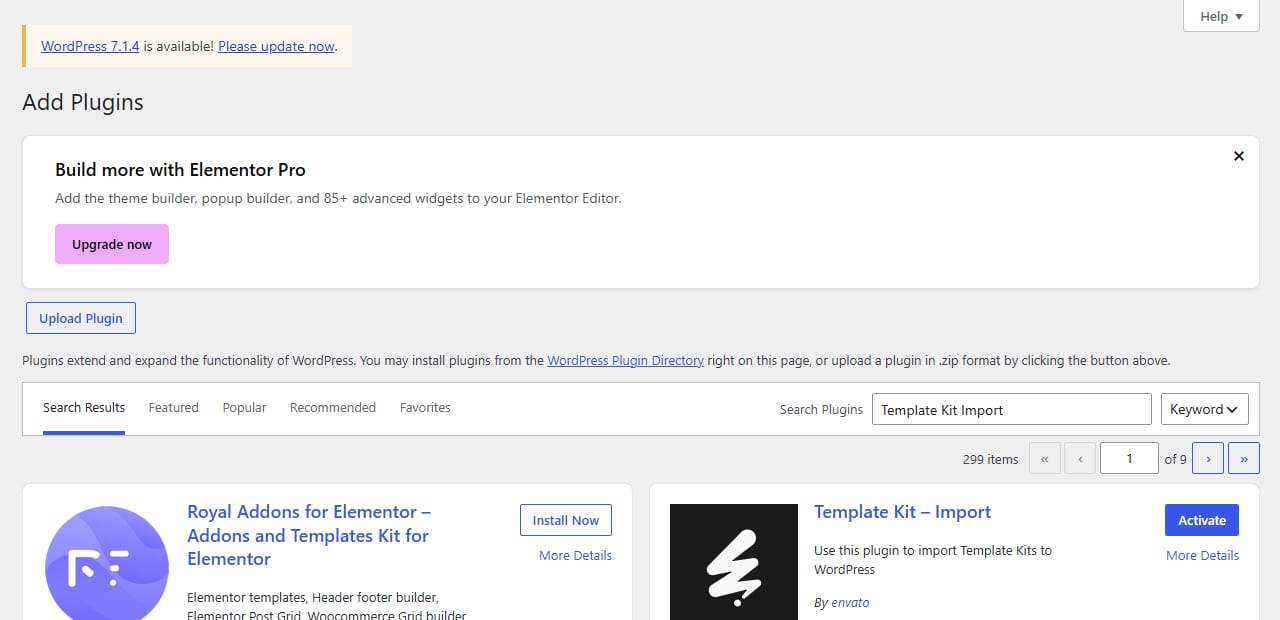
One technical note: the plugin’s WordPress.org listing currently asks for PHP 8.3. If your host is on an older PHP version, change it in your hosting panel first (most hosts have a one-click PHP version switch).
2. Upload the kit
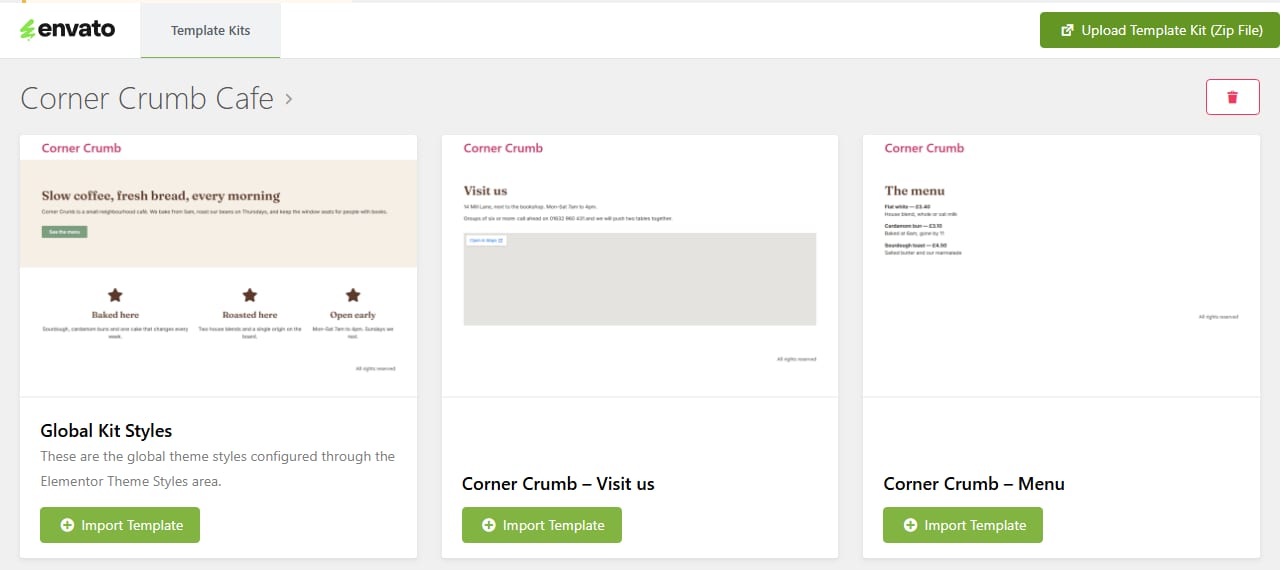
The plugin adds its screen under Tools → Template Kit. Click Upload Template Kit (Zip File) and choose the kit zip. Use the inner kit zip, not the whole download, if your purchase came as a zip inside a zip.
After the upload you’ll see the kit’s name and a card for every template in it, each with an Import Template button.
3. Install the requirements
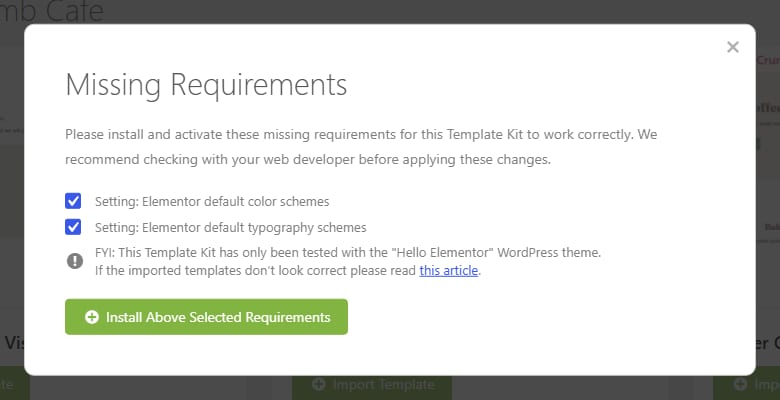
Above the cards you may see a yellow banner: “Attention! There are 2 requirements that need installing for this Template Kit to work correctly.” Click Install Requirements. For our kit, the two “requirements” weren’t plugins at all. They were two Elementor settings (Elementor’s default colour schemes and default typography schemes), which the importer switches off so the kit’s own colours and fonts can take over. Leave both ticked and click Install Above Selected Requirements. Kit authors also record which plugins their kit depends on when they export it, so if the kit was built with an extra plugin (a forms plugin, say), check the kit’s description and install it before importing the pages that use it.
4. Import Global Kit Styles first
This is the step most people skip, and it’s why their kit “looks wrong”. Find the card called Global Kit Styles (“the global theme styles configured through the Elementor Theme Styles area”) and click Import Template on it before anything else. On our test site this switched the site’s Elementor styles over to the kit’s own set (it appeared as “Kit Styles: Corner Crumb Cafe”), with its colour palette and fonts.
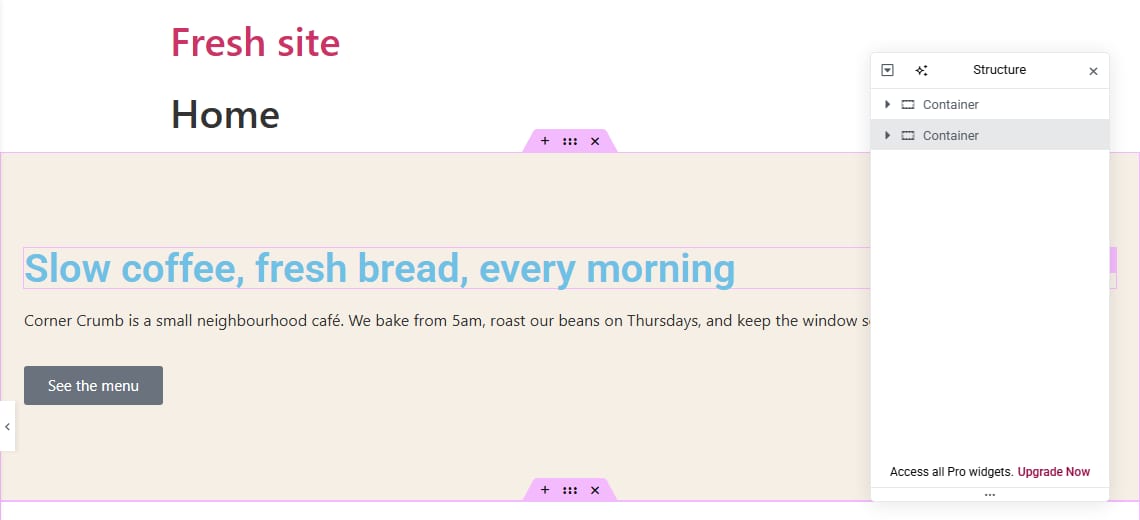
We tried it the wrong way round first, deliberately. Without Global Kit Styles, the Home template came in with Elementor’s default bright blue headings and the default font, nothing like the kit preview:
5. Import the page templates you want
Now click Import Template on each page design you want. Each card then changes to “View Template” and “Import Again”. Here’s the bit the plugin doesn’t spell out: importing doesn’t create a page. It saves the design into Elementor → Templates (your saved templates). Your site’s pages are still empty until you place the templates on them.
6. Put a template on a page
- Go to Pages → Add Page, give it a title (for example Home), and open it with Edit with Elementor.
- In the empty page area click the folder icon, Add Template.
- The library opens with three tabs: Blocks, Pages and Templates. Click Templates. That’s where your imported kit designs are.
- Hover the one you want and click Insert.
7. Set the page layout to full width
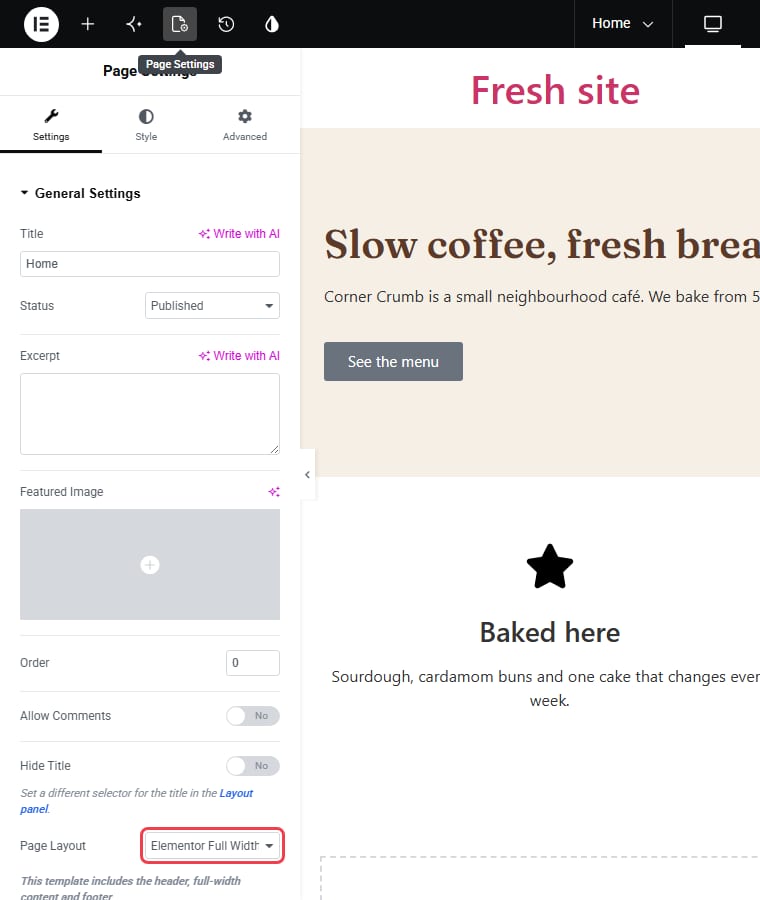
If you publish now, you’ll probably see the page title (“Home”) printed above the design, and the content boxed in by the theme. Fix it in the editor: click the Page Settings icon in the top bar, then under Page Layout choose Elementor Full Width (the other options are Default, Elementor Canvas and Theme). Full Width keeps your theme’s header and footer; Canvas removes them too, which suits landing pages. There’s also a Hide Title switch in the same panel.
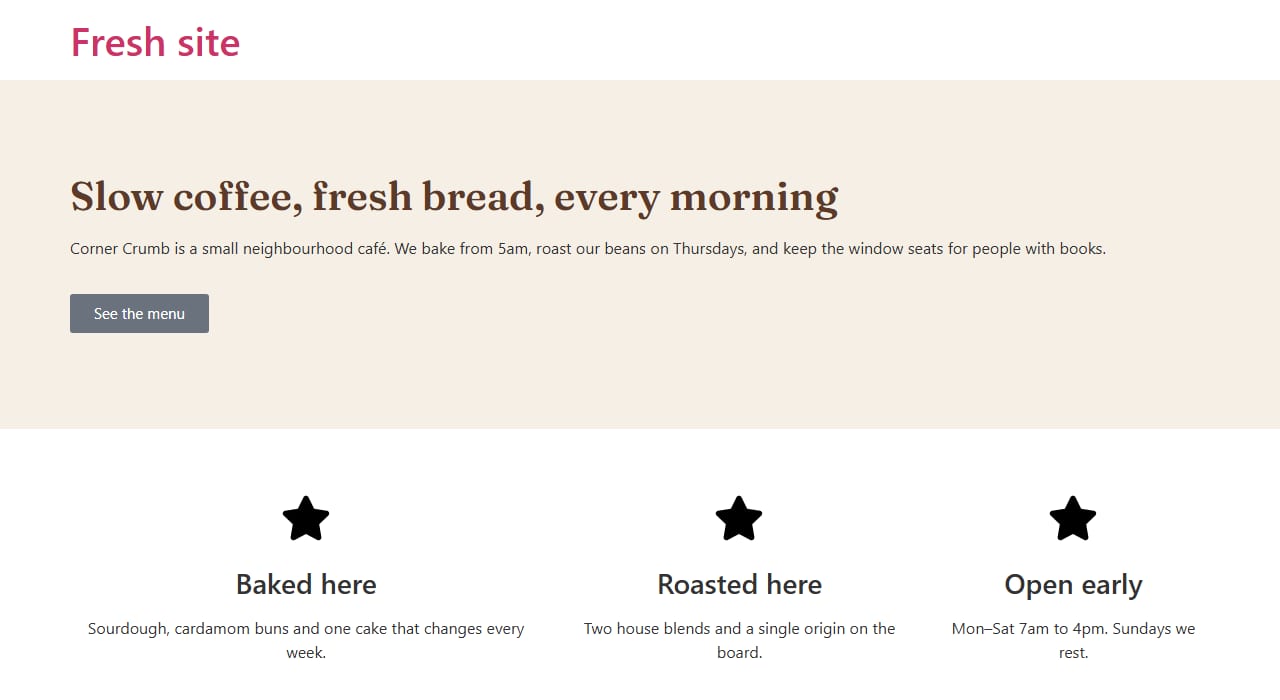
Click Publish. With Global Kit Styles imported and the layout set, our page finally matched the kit: brown serif headings, the cream hero and no stray title.
Repeat steps 6 and 7 for each page, then set your front page under Settings → Reading (“A static page”, then pick your Home page) and build your menu under Appearance → Menus. An Envato kit doesn’t do those for you.
If something looks wrong after importing
The colours and fonts are Elementor’s defaults (light blue headings, plain font). Global Kit Styles wasn’t imported, or another kit’s styles are still active. Go back to Tools → Template Kit, open the kit and import Global Kit Styles. For Route A kits, re-run the import with Settings & configurations ticked.
There’s a page title or a narrow column above the design. Set Page Layout to Elementor Full Width (or switch Hide Title on) in that page’s Page Settings.
The header and footer from the preview are missing. On free Elementor that’s expected: theme headers and footers are a Pro feature, so the Templates row was locked during import. Your theme’s own header shows instead. Either add Elementor Pro, or use a theme whose header and footer are part of the theme itself.
The upload fails or nothing happens. Check you’re uploading the inner kit zip, not the whole marketplace download. Large kits can also hit your host’s upload limit; the maximum size is shown under Media → Add Media File, and your host can raise it.
Some sections are blank or show a notice about a missing widget. The kit uses a widget from a plugin you haven’t installed (or from Elementor Pro). Look at the kit’s requirements again and install what it lists.
The photos are grey placeholders. Many kits ship without the stock photos the preview uses, for licensing reasons. Envato’s exporter even has a step where the author records where each image came from. Replace them with your own photos; that’s better for your business anyway.
Route C: an Elementor theme, when you don’t want to assemble it
Kits are flexible, but you’ve probably noticed how many steps sit between “I have a zip” and “my site looks like the preview”: the right theme, the requirements, Global Kit Styles first, then every page by hand, then layout, front page and menu. And on the free plugin you still won’t get the header and footer you saw in the demo.
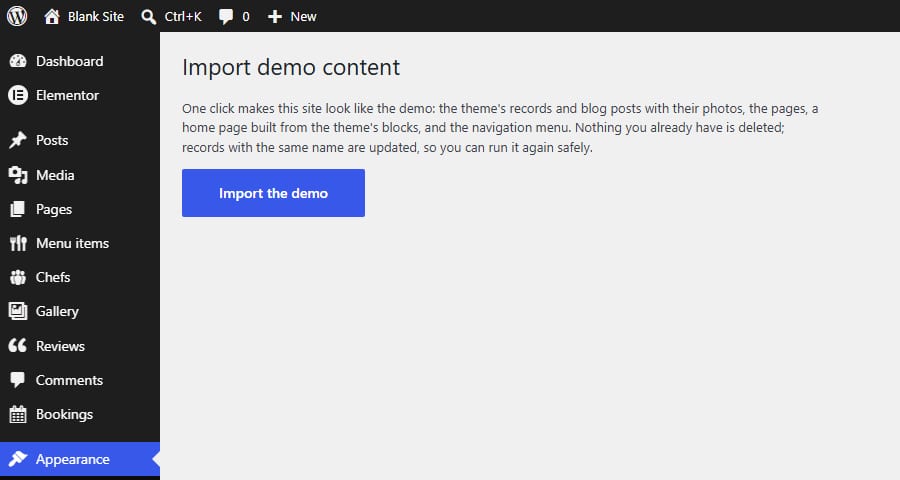
That’s why our own Elementor products are built as themes rather than kits. Take Bistrofeast, our restaurant and café Elementor theme. You install it like any WordPress theme (Appearance → Themes → Add New Theme → Upload Theme), then click once to install its companion plugin, which comes inside the theme. After that, Appearance → Import demo content → Import the demo takes about a minute and builds the menu items, chefs, gallery, reviews, blog posts and the pages (Home, About, Book a table, Contact, Thank you), sets up the header menu and makes Home the front page.
It runs on free Elementor: the header and footer belong to the theme and are edited in the Customizer, so nothing is locked behind Pro. Each section of the design is its own Elementor widget (search “Bistrofeast” in the widget panel) with its text, layout switches and colours in the left panel. Running the import again updates the demo records rather than duplicating them, and it never deletes anything you already have.
A theme isn’t always the better choice. If you want to mix and match designs, or you already own Elementor Pro and love building headers in Theme Builder, a kit gives you more freedom. But if you want a finished site you can edit, on the free plugin, with the least setup, a theme is the shorter road. You can browse all our Elementor themes, and if you’re still deciding between platforms, our comparison of Next.js vs WordPress for a small business website covers that choice.
FAQ
Do I need Elementor Pro to install a template kit?
No. The importers work on free Elementor. But if the kit includes headers, footers, popups or archive templates, those parts need Pro, and on the free version they’re skipped (Elementor’s importer shows that row locked with an Upgrade button). The pages and global styles still import.
Where do I upload an Elementor kit zip?
For an Elementor website template, go to Elementor → Tools → Website Templates → Apply a Website Template → Import. For an Envato kit from ThemeForest or Envato Elements, install the “Template Kit – Import” plugin and use Tools → Template Kit → Upload Template Kit (Zip File). Templates → Import Templates is only for single template files.
Why does my imported kit not look like the demo?
Usually one of three things: Global Kit Styles wasn’t imported (so Elementor’s default colours and fonts show), the page layout isn’t set to Elementor Full Width (so the theme adds a title and boxes the content), or the demo’s header and footer need Elementor Pro. Also check you’re using the Hello Elementor theme.
Will importing a kit delete my existing pages?
In our tests neither importer deleted existing pages. An Elementor website template does replace your front page and your global colours and fonts, though, which changes how every page looks. Take a backup before importing into a site that already has content.
Which theme should I use with an Elementor kit?
Hello Elementor, unless the kit says otherwise. Envato’s importer states that kits have only been tested with it, and it adds almost nothing of its own, so the kit’s design shows as intended.
What’s the difference between a template kit and an Elementor theme?
A kit is a set of page designs and styles that you import into Elementor and place on pages yourself, on top of a theme such as Hello. An Elementor theme is the whole website package: it includes its own header and footer, and usually a one-click demo import that creates the pages, menu and content in one go.
More from the blog
Next.js vs WordPress for a Small Business Website (2026)
We built the same restaurant website as a WordPress theme and as a Next.js template with Payload CMS. Here is where they really differ, and how to choose.
Read article →
How to Build a Portfolio Website That Gets You Hired (2026)
Recruiters give your portfolio about a minute. I tested our portfolio templates the way a hiring manager would: opened the projects, pressed the CV buttons, sent the contact forms. Here is what matter...
Read article →
Restaurant Website Templates With Menus, Table Booking and Online Ordering (2026)
Seven free restaurant and café templates, checked for what their menus, booking forms and order pages really do — and where the free HTML stops and a WordPress or Next.js version with a real admin pan...
Read article →